AR Ruler Codebase Review: A Developer's Deep Dive into Monetizing ARKit - Download
AR Ruler Codebase Review: A Developer's Deep Dive into Monetizing ARKit
The App Store is a modern-day gold rush, and Augmented Reality is the new frontier. Every developer has seen the potential, but bridging the gap from a novel idea to a published, revenue-generating app is a chasm filled with complex APIs, boilerplate code, and monetization headaches. This is where code templates promise a shortcut, a pre-built vehicle to get you to the finish line faster. Today, we're tearing down one such template: the AR Ruler Camera Measure Tool - Swift - Native iOS - Latest Code for Admob Monetization. We're not just looking at the feature list; we're popping the hood, inspecting the engine, and giving you a senior developer's take on whether this is a solid foundation for your next project or a lemon waiting to leave you stranded.
First Impressions: The Core User Experience
Before diving into a single line of Swift, the first step is to evaluate the product as a user would. What does this app claim to do, and how well does it do it? The AR Ruler's premise is simple and immediately understandable: use your iPhone's camera to measure distances, areas, and even volumes in the real world. It's a classic utility app, the kind of tool that has a genuine, if niche, audience.
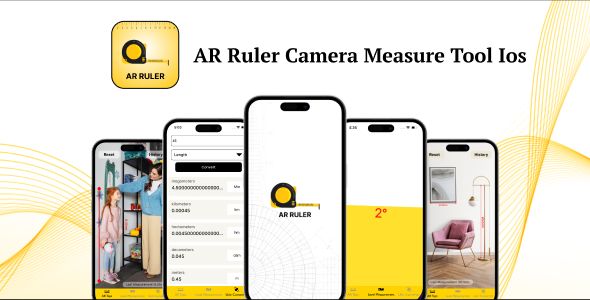
Upon launching the pre-compiled demo, the experience is straightforward. The UI is clean but generic, which is exactly what you'd expect from a template. It's a blank canvas, not a finished masterpiece. The app immediately requests camera access and starts the ARKit session. The screen displays the camera feed, overlaid with instructions to move the phone around to detect a surface. This surface detection is the linchpin of any AR measuring app. Here, it works reasonably well. In a well-lit room with a textured floor, it finds the plane quickly. In less-than-ideal conditions—a single-color glossy table or a dimly lit area—it struggles, which is a limitation of ARKit itself, not necessarily the app's code.
The core measurement loop involves tapping to place points. Two taps create a line, displaying the distance in real-time. Three or more taps can close a shape to calculate area. The "Cube" or "Volume" tool is a bit more ambitious, allowing you to define a rectangular area on a flat surface and then extrude it upwards to create a 3D box, calculating its volume. The tools are functional, but the precision is, as with all ARKit measurement apps, "good enough for government work." You can get a decent estimate of a room's dimensions, but you wouldn't use it to cut lumber for a cabinet.
UI/UX Shortcomings
The user experience isn't without its rough edges. The controls for switching between tools (Line, Area, Cube) are basic buttons. There's little in the way of onboarding beyond a simple startup alert. A new user might not immediately grasp that they need to move their phone to initialize the world tracking. The feedback for placing a point is a simple 3D sphere. It works, but more sophisticated apps provide better visual cues.
These are not deal-breakers. In fact, for a developer, they represent clear opportunities for improvement. The core AR logic is in place; a developer's job would be to build a more polished and intuitive user experience around it. The template gives you the engine and chassis, but you're expected to provide the custom bodywork and interior.
The Technical Deep Dive: Inside the Xcode Project
Alright, let's get our hands dirty. After unzipping the source code package, we're greeted with a standard Xcode project structure. It’s a relief to see that it isn't a complete mess. The files are logically grouped, with folders for ViewControllers, Models, Views (for custom UI elements), and Helpers. This basic organization is a green flag, suggesting the original author had some sense of order.
Architecture and Code Quality
The app is built using Swift and relies heavily on Apple's native frameworks: UIKit for the interface, ARKit for the augmented reality session, and SceneKit for rendering the 3D lines and shapes into the scene. There's no use of SwiftUI, which makes sense for a template aimed at broad compatibility and a more traditional development approach. For developers still rooted in the UIKit world, this is a plus.
Digging into the code, the architectural pattern is a very straightforward Model-View-Controller (MVC). This is Apple's default, and while it often gets a bad rap for leading to "Massive View Controllers," it's a pragmatic choice for a template. It’s easy for a junior or mid-level developer to understand without needing to first learn the intricacies of MVVM or VIPER.
The main view controller, let's call it ARViewController.swift, is indeed the heavyweight champion of this project. It handles:
-
Setting up and managing the
ARSession. -
Handling user gestures (taps on the screen).
-
Implementing
ARSCNViewDelegatemethods to interact with the AR world. -
Updating the UI with measurement results.
-
Managing the state of the different measurement tools.
Is it bloated? Yes. A purist would argue that the AR session management, gesture handling, and state logic should be broken out into separate manager and helper classes. However, for a project of this scale, it remains manageable. The methods are reasonably well-named, and the code isn't overly nested or complex. You can trace the logic from a user tap to a 3D point being placed without getting lost. The lack of extensive comments is a minor downside, but the self-documenting nature of Swift and clear method names compensate for it.
One positive sign is the use of enums to manage the different measurement tools and application states. Instead of relying on magic strings or integers, the code uses a MeasurementState enum, which makes the logic in the gesture handlers much cleaner and less error-prone. This is a small detail that indicates a level of professionalism beyond the bare minimum.
Monetization Analysis: The AdMob Integration
The product title prominently features "Latest Code for Admob Monetization." This is a major selling point. Many developers can build a tool, but figuring out how to make money from it is another challenge entirely. Let's see how this template delivers.
The integration uses the official Google Mobile Ads SDK, which is the correct approach. The setup involves two key components: a banner ad and interstitial ads.
1. Banner Ad: A standard banner is anchored to the bottom of the main screen. It’s implemented correctly, respecting the safe area so it doesn’t overlap with UI on newer iPhones. The code to load the banner is typically found in the viewDidLoad method of the ARViewController. It's a simple, set-and-forget implementation that provides a steady, if small, revenue stream.
2. Interstitial Ads: These are the full-screen ads that pop up between user actions. They generate significantly more revenue than banners but are also far more intrusive. The strategy here is crucial. In this template, the interstitial ad is configured to load at launch and is then presented at specific trigger points. A common trigger might be after the user completes a measurement and hits a "reset" or "clear" button.
The implementation is decent. The code pre-loads the interstitial so that when the trigger point is hit, the ad can be shown instantly without a loading delay that would disrupt the user experience. However, the frequency is something a developer must carefully manage. The template provides the mechanism, but you need to define the policy. Showing an interstitial every single time the user clears the screen will lead to uninstalls. A better approach, which you would need to implement yourself, would be to use a counter and only show the ad after every 3rd or 5th action.
Is it the "Latest Code"?
This claim is always a moving target. The AdMob SDK is updated frequently. When you purchase this template, you'll need to check for the latest version of the Google-Mobile-Ads-SDK and potentially update it using CocoaPods or Swift Package Manager. The core implementation logic for banners and interstitials, however, has been stable for a while. The code provided is modern enough that it won't be deprecated tomorrow, but you should always plan to manage your dependencies. The real value isn't that it's the absolute latest version, but that the entire framework for displaying ads is already built and wired into the app's lifecycle.
The Developer's Guide: Installation and Configuration
So you've bought the template and you're ready to make it your own. Here’s a no-nonsense guide to getting from a .zip file to a running app on your device.
Prerequisites:
-
A Mac running the latest version of macOS.
-
The latest version of Xcode installed from the App Store.
-
An active Apple Developer Program membership (required to run ARKit apps on a real device).
-
An iPhone or iPad that supports ARKit. The simulator will not work for AR features.
Step 1: Project Setup
First, unzip the downloaded file. Navigate inside and find the .xcodeproj or .xcworkspace file. If the project uses CocoaPods for dependencies (like AdMob), you must always open the .xcworkspace file.
Step 2: Bundle Identifier and Signing
This is the most critical step to making the app yours.
-
Open the project in Xcode and select the project name in the Project Navigator on the left.
-
In the main editor window, select the
TARGETSand then theSigning & Capabilitiestab. -
You'll see a
Teamdropdown. Select your personal or company developer account. Xcode might complain about the Bundle Identifier. -
The Bundle Identifier is the app's unique address on the App Store. It's usually in a reverse-domain format (e.g.,
com.yourcompany.ar-ruler). Change the default identifier to one that is unique to you. The template might havecom.templateauthor.arruler; you must change this. -
Once you set your Team and a unique Bundle Identifier, Xcode should be able to create the necessary provisioning profiles for you automatically. You should see the signing status switch to a green checkmark.
Step 3: Configuring AdMob
To get paid, you need to link the app to your own AdMob account. This involves two sets of keys.
First, the App ID:
-
In your AdMob account, create a new app. AdMob will give you an App ID.
-
In Xcode, open the
Info.plistfile. -
Look for a key named
GADApplicationIdentifier. The template author should have a placeholder value there. -
Replace the placeholder value with your own AdMob App ID. Do not skip this step. As of recent AdMob SDK versions, your app will crash on launch if this key is missing or incorrect.
Second, the Ad Unit IDs:
-
In your AdMob account, create at least two Ad Units: one for the banner and one for the interstitial.
-
AdMob will give you a unique ID for each.
-
Now, find where these are set in the code. A good template will place them in a dedicated constants file, perhaps named
Constants.swiftorConfig.swift. You might find something like: let ADMOB_BANNER_ID = "ca-app-pub-3940256099942544/2934735716" // Test ID let ADMOB_INTERSTITIAL_ID = "ca-app-pub-3940256099942544/4411468910" // Test ID -
Replace the test IDs (which show test ads) with your own live Ad Unit IDs.
Step 4: Build and Run
Connect your iPhone to your Mac. In Xcode, select your device from the dropdown menu at the top (next to the play and stop buttons). Hit the "Play" button (or Cmd+R) to build and run the app on your device. It should launch, and after a few moments, you should see a live banner ad from your AdMob account at the bottom.
Customization and Long-Term Viability
A template's true value is measured by how easy it is to customize. A codebase that fights you at every turn is worse than starting from scratch. Fortunately, this project is reasonably malleable.
Reskinning the app is straightforward. The colors and fonts are likely defined in the Interface Builder (.storyboard files) or in an Asset Catalog (.xcassets). By changing the global tint color and replacing the few image assets, you can give the app a completely different feel in under an hour. This is the low-hanging fruit of customization.
Adding new features is the real test. Let's say you wanted to add a "Save Measurement" feature. You'd need to:
-
Design a model object to store the measurement data (e.g., type, points, result).
-
Add a "Save" button to the UI.
-
Implement the logic to capture the current measurement when the button is pressed.
-
Write the code to persist this data, likely using
UserDefaults,Core Data, orSwiftData. -
Create a new
UIViewControllerto display a list of saved measurements.
Because the architecture is a simple MVC, you have a clear, if not perfectly decoupled, place to add this logic. The modularity is average. You won't be plugging in new features like Lego blocks, but you also won't need to rewrite the entire application to make a change. This is the reality of working with most app templates found on marketplaces like the one from GPLPal. They are designed for rapid deployment, not for the perfect architectural purity you might find in open-source projects. This business model contrasts sharply with the world of web development, where you might find Free download WordPress themes that offer immense customization through well-defined plugin APIs and child theme structures. The mobile app template world is often more rigid; you're buying a starting point that you are expected to modify directly.
The Verdict: Who Should Buy This Codebase?
So, after tearing it down, is the AR Ruler template a good investment? The answer depends entirely on who you are.
This codebase is a strong buy for:
-
The Indie Hustler: If your goal is to get a functional, monetized app onto the App Store in weeks instead of months, this is a massive accelerator. The grunt work of setting up the AR session, handling vector math, and integrating ads is done. You can focus on polishing the UI and marketing.
-
The Learner: For a developer new to ARKit, this is a fantastic learning tool. It's a complete, working project you can tinker with. By changing the code and seeing the immediate effect in the AR view, you'll learn far faster than by reading documentation alone.
-
The Prototyper: If you're an agency or developer tasked with building a proof-of-concept for a client, this template gets you 80% of the way there on day one. You can quickly demonstrate the core functionality before committing to a full-scale custom build.
You should probably avoid this codebase if:
-
You're a Software Purist: If you believe in strict MVVM, TDD, and beautifully decoupled components, the simple MVC structure and the "Massive View Controller" will likely offend your sensibilities. You'd spend more time refactoring it to your standards than you'd save.
-
You're Building a Flagship Product: If this app is meant to be the core of your business, to be maintained by a large team for years to come, you're better off building a custom architecture from the ground up that is tailored to your specific long-term needs.
Ultimately, this AR Ruler source code delivers on its promise. It's not a golden ticket to passive income, and it's not a perfect piece of software engineering. It's a tool. It's a well-built, pragmatic, and affordable launchpad for a specific type of iOS application. For the right developer with the right goals, it saves hundreds of hours of development time, and that's a value proposition that's hard to ignore.
评论 0